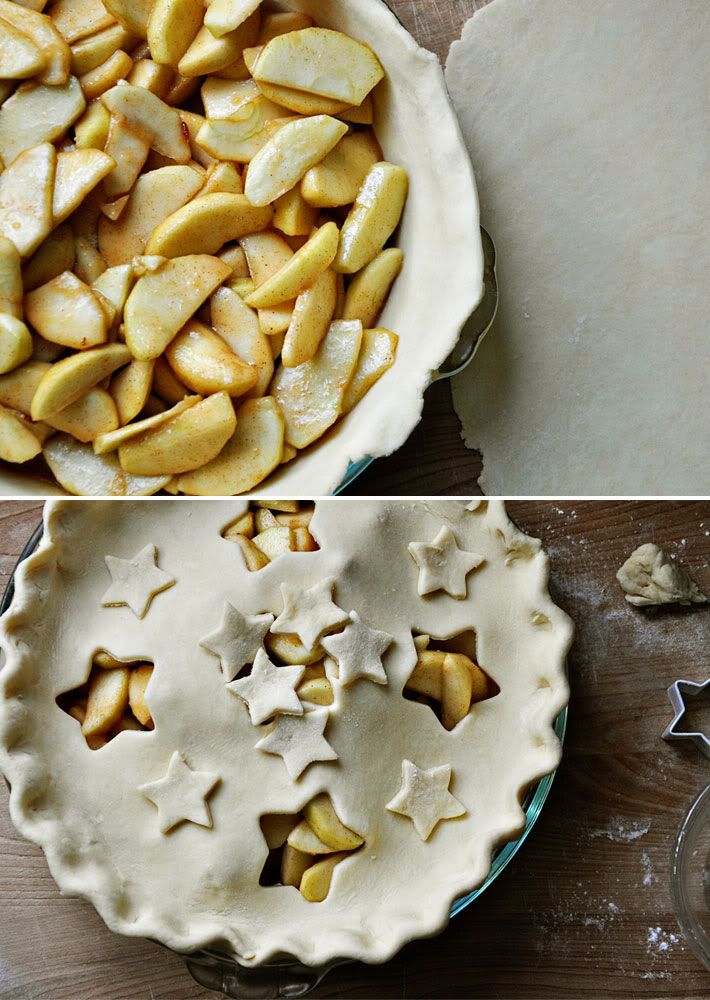
I made this pie a few weeks ago, after we went apple picking and came home with a ridiculous supply of apples. Some of them ended up in this Roasted Cardamom Applesauce. Many made their way into school lunch sacks. But, we still had about a dozen left and I really wanted to make a pie.
I've made apple pie before, but it was so long ago I have no idea what recipe I used. When looking for an apple pie fix, without as much work, I usually end up making something faster and easier...like Apple Crostata, or Apple Crisp. This time, I wanted the real thing and after some browsing around the Internet in search of a great recipe, I found this one by Rose Levy Beranbaum.

Making pie crust isn't my strong suit. I mean, the process is simple enough...but, I usually encounter the typical issues, like struggling to get it rolled out evenly {and never in an actual circle!} or having the crust shrink back in the pie pan as it cooks {which I'm told is caused by stretching the dough too much}.

As simple as the actual act of making short crust is, it's the whole process involved in making a pie, tart, quiche, etc. that's time consuming. You chill the ingredients, then mix the ingredients, then chill the dough, then roll it out, then chill again, then pre-bake or fill, then chill again, then finally cook the dang thing. I'm not a lazy person in the kitchen, and I am no stranger to cooking processes that take all day. In fact, I usually love tackling tricky recipes. But, when I'm looking for instant gratification, making pie crust isn't what you'll find me doing. The pâte brisée {short crust pastry} I usually make is also available here...and as proof that it involves many steps, I've got the post divided into two parts.

The recipe I linked to above is a standby recipe for me. But, this pie crust came out fantastically as well and it would be difficult for me to decide which I prefer. It was crispy, flaky, light in texture...all the things a pie crust should be. I cut back on some of the tasks involved in the original recipe, only to save on time. At some point, I would like to make the dough exactly as described...and if I ever do, I'll be sure to let you know if it ends up even better.

One thing that attracted me to this recipe is the process used in make the filling. The peeled, cored and sliced apples are mixed with brown sugar, white sugar and traditional apple pie spices, then left to macerate.


The result is an amazingly delicious sweet liquid, which is reduced to a syrupy consistency and then added back to the apples. The pie should really be called Caramel Apple Pie, because that's exactly what the finished filling tastes like.

The dough is very easy to use and roll {which I was very happy about!}, and it's the addition of cream cheese that gives it a very pliable texture. It also adds a slight tartness which balances well with the sweet filling.

You could use the top crust to make a traditional double crust apple pie, and simply cut a few slashes in the top to vent the filling. Or - you could do what I did and cut out little decorative shapes using cookie cutters or pie crust cutters. A lattice crust would be really pretty too.

However you decide to decorate the crust is fine, but don't forget the most important touch. A big scoop of vanilla ice cream.
Apple Pie
Adapted from The Pie & Pastry Bible by Rose Levy BeranbaumServes 8
I supposed you could say I've taken the original recipe and simplified it...yet, even so, making this pie is still a detailed task, with many steps. Yet, so worth it! In the recipe, as written, you are instructed to freeze the flour mixture, butter and cream cheese ahead of time. I didn't have the time to do all that, so I skipped it. I would be interested in seeing if taking the time to freeze everything produced a better end product...but, I'll have to save that for another day. I thought the crust came out fantastic, so I'm not sure I would change a thing.
Through some research I conducted on this particular pie crust recipe, it seems that the general preference is the use of pastry flour. However, at the time I made this pie I didn't have any on hand. I used plain all-purpose flour and it came out great. Use whichever you have on hand, or prefer. I was a bit hesitant about using cider vinegar in the dough, but it really does add a perfect touch to the crust...don't skip it!
For the Crust:
2 cups flour {or 2 cup + 3 tablespoons pastry flour}
more flour for dusting
1/4 teaspoon sea salt
1/4 teaspoon baking powder
4 1/2 ounces cold cream cheese
12 tablespoons cold unsalted butter {cut into small cubes}
2 tablespoons ice water
1 tablespoon apple cider vinegar
For the Filling:
2 1/2 pounds tart apples {about 6 apples - peeled, cored & cut into 1/4" slices}
1 tablespoon freshly squeezed lemon juice
1/4 cup {packed} light brown sugar
1/4 cup sugar
1/2 teaspoon ground cinnamon
1/4 teaspoon freshly grated nutmeg
1/4 teaspoon sea salt
2 tablespoons unsalted butter
1 tablespoon + 1 teaspoon cornstarch
1. For the Crust: Place the flour, salt and baking powder in the bowl of a food processor and pulse several times to combine. Cut the cream cheese into three pieces and add to the processor. Process until the mixture resembles coarse meal, about 30 seconds. Sprinkle the cubes of butter over the top and pulse until the largest pieces are no bigger than a pea. Add the water and vinegar and pulse several times, or until the liquid is evenly distributed. Dump the mixture out onto a lightly floured work surface and work together into a ball. Divide the dough in half and shape each into a disc. Wrap in plastic wrap and chill for 45 minutes, or overnight. {Note: This process can also be done by hand using a pastry blender}
2. For the Pie: Remove one disc of dough from the refrigerator and allow to soften for 10 minutes. On a lightly floured work surface, roll the dough out to an 1/8" thickness. Fit into a pie plate, leaving a slight overhang around the edges {trim any excess}. Cover with plastic wrap and chill for 30 minutes, or up to 3 hours.
3. In a large mixing bowl toss the apples, lemon juice, both sugars, cinnamon, nutmeg and salt to combine. Allow to sit for a minimum of 30 minutes, or up to 3 hours, for the apples to release their juices.
4. Transfer the apples and their juices to a colander propped over a bowl to catch the liquid. There should be about a 1/2 cup of liquid released.
5. Pour the liquid into a small saucepan and add the butter. Bring to a boil over medium high heat. Lower the heat slightly and continue simmering until the mixture reduces to about a 1/3 cup, or until syrupy in consistency. As the mixture cooks, swirl it around in the pan if needed, but avoid stirring. Meanwhile, toss the drained apples with the cornstarch, in a mixing bowl, until evenly coated and any lumps of cornstarch disappear. Pour the syrup over the apples; toss gently. {Note: The liquid might harden when it comes in contact with the apples. This is fine, as it will melt once baked}
6. Roll the remaining disc of dough out to an 1/8" thickness, being sure it's rolled out large enough to cover the pie. Depending on how you'd like the top crust to look, you can leave as is, or cut decorative shapes out. Transfer the apple mixture to the pie shell. Moisten the edges of the bottom crust with some water and lay on the top crust. Crimp the edges together firmly, trim away any excess, and shape the border using your fingers. If using an undecorated top crust, cut several 2" long slashes into the crust to let the steam escape {if you've cut shapes out you can skip this part}. Cover the pie loosely with plastic wrap and chill for 1 hour {according to the original recipe, this helps relax the pastry and helps maintain flakiness}.
7. While the pie is chilling, place the oven rack at the lowest level and place a baking stone, or cookie sheet on it. Preheat the oven to 425 degrees. Set the pie directly on the stone, or baking sheet and bake for 45-55 minutes, or until the juices are bubbling and the crust is golden brown. After 30 minutes of baking, place a pie shield, or pieces of foil over the edges of the crust to prevent them from burning. Cool the pie for 4 hours before serving. Serve warm or at room temperature. But - always with vanilla ice cream.
Click here for the printable recipe.


4 comments:
I've been using Rose Berenbaum's apple pie recipe for years after having been given the book for a college graduation gift and haven't yet found a pie recipe that's better (except my Mom's). I never freeze the flour mixture either!
That's good to know! Thanks Renee :)
this pie looks absolutely gorgeous! love the stars!
It's 7 am. And I want pie for breakfast.
Post a Comment